Selecting the Photos or Video Clips
Once you set up the script for the narrative and corresponding photos and video clips, you can select these from those you already have. Or you or your video editor can select them from any of the free or paid stock photo and video sources.
To save money in creating the sizzle reel, select the photos or clips from your collection or obtain them yourself from one of the stock photo and video sources. This will save the video editor time in searching for the photos and clips and then getting your approval before buying them.
The major photo sources include Pixabay and Pexels for free photos, though it’s nice if you tip the photographers or service for these photos. The major stock photo services include Istock.com, Adobestock.com, Shutterstock.com, 123rf.com, Dreamtime.com, Depositphoto.com, Storyblocks.com, and others.
Some of these services also offer video clips. Generally, I have found that the paid services have a better selection, and they have more keywords for selecting more specialized photos or clips, such as if you’re searching for a photo for “British Guiana” or “a woman and man arguing at work”. If you put in one or two words, such as “business” “success” or “business success,” most services will find something, but the paid services usually have a larger selection.
Depending on whether you have a subscription or are seeking a single photo or clip, the cost on a paid service will range from $3 to $4 to $12 per photo and more for video clips. I have typically used three or four services in selecting photos for these scripts, which average about 20-30 photos for a 90 second to 3 minute video. I generally haven’t used video clips because of the higher cost.
As you select photos or video clips to go with the different lines of the script, number each photo or clip accordingly, so you can readily line up the photos and clips with the corresponding narrative. Label the photos or clips based on the line of the script they are matching, so it’s very clear what photos or clips you are matching with what line. For instance, in naming the photo files for The Neanderthals Return script, I numbered and named them in the following way: 01 – Neanderthals in Cave.jpg, 02 – DNA Cloning, 03 – Neanderthals Return Book; and so on.
If you are not sure what photos or videos to get from paid services, you can download comps or preview images, which are low resolution versions with the company’s watermark or line of text at the bottom of the photo with the company’s name. By initially getting comps or preview images, you can decide which photos or clips to use. If you are looking images for a long copy line, perhaps use two photos or clips, and show one after another. Once you make a final decision, you can easily buy and download the final images, since the comp and preview files will include the number of that image for that service.
Combining the Photos or Video Clips with the Script
After you get the photos and video clips for the script, you can readily combine the narrative and photos. It is possible to skip this step of combining the photos in the script, which can help you see how the video will come together. But I find it useful to look at the photos and any video clip thumbnails together with the script copy. Inserting the images into the script is also helpful for choosing among two or more images to select the final image.
I also use this approach when creating a sizzle reel for a client, so the client can see any selected or suggested images in the script and decide which ones to choose. This process also provides a way to review the script and make any changes, such as combining two short lines to match a single photo or video clip or breaking up longer lines to go with additional photos or clips.
Should there be any changes in the wording, you can easily make another text-to-voice recording, or perhaps select the photos and video clips first before setting up the narration.
Should you hire a live narrator, it is best to select the photos and any video clips first and use these to finalize the script, so the narrator doesn’t have to redo the narration.
If you are adding any text to echo the narration (though not recommended), you would add this in a photo or video editor, such as Canva or Crello.
Here’s an example of setting up a script with images for a client. It includes the first 10 lines and images to illustrate what this script and photo layout looks like. The photos are ones I suggested, so they still have the stock photo house logos or names and photo ID, so I can easily find them to buy them.
I have taken out identifying information for the client, though the final video is available online for anyone to see.
1) …The Big Con, based on a true story, is an action/adventure drama of international intrigue
BOOK COVER HERE
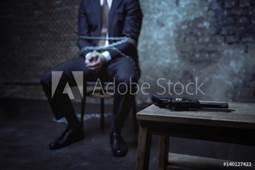
2) as the big con extends from Canada to China

3) and ends with a kidnapping.
4) It all starts when …, who has created an aviation training company in Vancouver

5) meets … who is from China and a friend of his wife.

Then, continue to match in photos or video clips to the end of your script before the last slide for the credits and contact information. As this example illustrates, I can show the client the proposed photos, and he or she can approve them or not. Then, I can buy the approved photos, as I did here.
Alternatively, if the client provides photos for each line of the script, I would put them here. In the event these aren’t good quality photos, placing them in the script is a good way to discover that and advise the client to either provide higher resolution photos or use stock photos instead. If a client still wants to use a low resolution photo, such as a scrapbook photo with sentimental value or one that shows off a career accomplishment, at least he or she will understand that the image will be blurry when it’s expanded to fit in a larger video screen.
For example, I had one client who was determined to use some bad photos of himself, so I used them in the video I created for him. But to provide a professional quality example of my own work, I exchanged the half-dozen low-resolution for high-resolution images I bought from a stock-photo house.
Next I’ll discuss creating your credits slide and selecting the music. After that, I’ll describe putting it all together.